 |
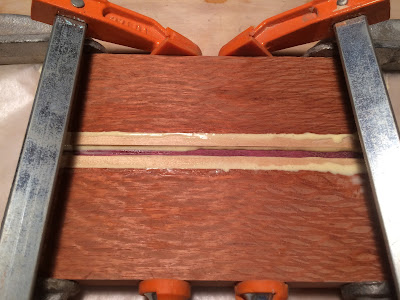
| Those are some big clamps |
This picture may be deceiving. I am not, in fact, gluing up another body blank. The above photo is documenting the first stage of making a veneer for the headstock overlay. I did this once before on a lapsteel guitar that I built. But in that case I was using store-bought paper thin veneer and it was to cover up a rather glaring mistake. This time I'm making it from scratch and it is to tie the neck and the body together in an aesthetic way. The above laminations are some of the scraps left over from gluing the body blank together. The two outer pieces are Lacewood, the middle pieces are Basswood and center piece is Purpleheart. Instead of using the extra mahogany I had left over I just turned the Lacewood on its side - to really show off the laces - as I felt this was missing from the body blank. I glued and clamped just like with the body blank and was left with this:
 |
Hey, look at that...
A chunk of wood!
|
 |
| All your fetishes, nightmares, and guitar plans can be found on the interwebs. |
Anywho! Depending on which headstock you are creating an homage to, you would: find the image, print it out and then take an exacto blade to it. And you are left with:
 |
| No trademark infringement is intended or implied |
One other issue that is a bit of a problem for me is that the headstock on the neck I am modifying isn't the same length or width as the above template. So, I will need to nip and tuck a bit - on both the existing headstock and the template. That may cause havoc with the tuning peg holes (the six circles in the above picture). But we'll burn that bridge when we get to it...
 |
| You know the drill... |
 |
| It's the same as about... |
 |
| 50% of the posts on here... |
 |
| It's all a bit repetitive, no? |
Ah! Here's something new and dangerous...
You are left with a big frickin block of wood. How the heck are you going to add this to the headstock? It'll be two inches thick...?
Now is the time that you make yourself a veneer (aka a really thin piece of wood). The best way to do this in a home shop is with a band saw. Sadly, I don't have one. And I wasn't wild about the idea of using the jig saw for this. A jig saw would just make a mess of it.
You could try using a table saw and running the piece through once then flipping it over and running it through again. But how do you hold such a small piece of wood with a spinning blade of death so close to your fingers? (No, seriously, if any wood workers want to share that bit of wisdom - I'm open!). The safest way (and the most time consuming by far) is to use a hand saw in a miter box.
...so, of course I didn't do it that way either...
I covered the whole thing in double-sided tape, stuck it to the end of a 4 by 4 piece of stock, and ran it through the chop saw.
 |
| Kind of like this... |
Lessons learned?
Well... It worked!
And the saw didn't kick the wood out and hit me in the teeth. So, I'm kind of happy about that.
In truth - even after it went through the saw - the workpiece was still pretty stuck to the 4 by 4. So, it was fairly safe. I didn't take pictures of this because I was concerned that someone would try it and lose an eyeball (wear your eye protection, you whippersnappers!) but I thought I should come clean - as a big part of this blog is to share my experiences - not just the outcomes.
Having said that - just as a way to cover my own, ahem, assets - please test the adhesion before you try this. I made sure that the workpiece and the 4 by 4 were strongly adhered to each other. I kept my body and face away from the most likely kick-out path of the workpiece. And I wore enough protection that most of my face was covered (eyes, ears, and nose/mouth).
Another thing that I didn't photograph (but should share) is that I had to do this a second time because the above veneer was too thick. The second one was about two thirds as thick as the above veneer - and that's the one you see in the photos below. I used the same process and had the same results.
I'm always open to safer methods - so please feel free to comment if you have an opinion.
 |
| I mustache you... Do you know how to use that thing? |
 |
| Pictured: Fiddly Routing |
.
 |
| That's when it goes from fiddling about to flinging about |
As you can see - there is some clean up work to be done. Much of it can be done with the belt sander. Some needs to be done with a coping saw, micro files, and a very sharp chisel.
 |
| How sharp? Very. |
When we get to the part where I glue the veneer to the headstock I'll tackle this properly.
There's still loads to do (tuning key holes, final shaping, binding, etc.).
Until then here is a preview of things to come.
 |
| Dirty Irish Money |
 |
| Dirty Sexy Guitar |
No comments:
Post a Comment