Showing posts with label bolt-on neck. Show all posts

Wednesday, December 5, 2018

Mini-Tele - Part 3: A splash of color

Subtle...
As previously mentioned - my son asked for a gold guitar.  
I said, "Everything gold?"
He said, "Everything!"

I said, "...okay."
I said, "...are you sure?"
He said, "I'm sure!"

(editor's note - when I told him the humbucker wasn't going to be gold - he got upset)

Okay.  Here we go!

Gold digger
Two things:

1) I've never spray painted a guitar before.  This is my fifth build (sixth if you count the incomplete Les Paul that still sits on top of my fridge) and I've finished all of them with stain, dye, or shellac under a Nitro finish.  I've got nothing against paint - it's just that all of my builds to date have been made with fairly attractive wood that I wanted to showcase and not hide under paint.  So this is new territory for me (read: plenty of NEW mistakes for me to make).

2) The medium of a blog is rife with dishonesty.  I didn't take a lot of photos of the process of painting the guitar.  So, it looks like this went swimmingly.  I can attest that it did not.  Also, time is a plaything in the blog medium.  This thing sat for months in my garage waiting for me to get my backside in gear and finish it.

Lies, damn lies, and statistics...
In brief:  I painted this with a generic gold color I purchased at Lowes and neither I nor my son was all that impressed.  It was only after stumbling on a really metallic gold paint (by accident in A.C. Moore) that we got to the color you see now.  Then, as I was preparing to spray a lacquer finish on it - I decided to wipe it down with some naphtha.  ...It had loads of dust (and cobwebs) on it from sitting all summer in my garage and I wanted a clean surface to spray on.  Yeah, it turns out that naphtha will strip spray-paint off like nobody's business.  So, I had to paint the guitar a third time.  Only this time the temperature had dropped and I was spraying in temps way too cold for rattle cans.  So, I'm not confident in how well the paint bonded to the previous coats.

When I finally did get to spraying lacquer - I was using a new brand - Watco - Lacquer, Gloss, Spray

...Let's just say - I'll never be using that brand again.  Stick with Behlan's Stringed Instrument Lacquer, kids.  It works!

I had already started spraying the neck with Behlans so I decided to not mix the streams with a different lacquer on the neck.  In the end, the body got 8 to 10 coats of Watco and the neck got 8 to 10 coats of Behlans.  The neck looks great (even though I used steel wool to dull the finish) and the body looks barely passable.  I never even finished polishing the body as weird black spots were starting to show up under the finish as I waxed on/waxed off.  This could have been the spray-paint I used, the temperature at which I sprayed things, or the lacquer.  Seeing as the neck had none of these issues and the only difference was what lacquer I used - you be the judge.

How you doin'?
With regards to the neck.  I did a fair amount of work to it.  I received it with a badly damaged finish (which I expected for $25).  I sanded off the existing finish and also reshaped the neck a bit.
Knowing that this will be a first guitar and not likely to be used for more than a year or two in this household - I went for comfort over perfection.  I skinny-ed down the neck at the 1st and 2nd frets
so that it would fit in my son's hand and perhaps make it possible for him to play first position (e.g. cowboy) chords.

Can't complain
I also worked on the fret ends quite a bit.  The fret ends were sticking out like barbed wire - so I filed those down and polished the frets as well.  I did a little fret leveling but not much.  If he gets to the point where he's ready to start ripping out an Angus Young solo - I'll dress these frets to perfection.  For now, the neck fits in his hand, won't cut him, and is mostly in tune.
Had some work done?
I also inlaid an Irish coin into the headstock because for some reason that has become my thing.  In this case, this is the first time I've used legal tender.  This is a 10 cent Euro coin.  I used it because it is gold colored.  It was a fabulous piece of good luck that I had a drill bit that was almost the exact size of this coin.  I'm happy with this part of the build.

So, while it's not perfect - the guitar now has a finish.  It's time to assemble it!

Tuesday, November 27, 2018

Mini-Tele Part 2: Cultural Appropriation

Theft
Never let it be said that a DIY blog about building guitars can't be socially relevant.

Yeah, I can't believe I typed that sentence either...

So what are we looking at?  It's a neck plate, dummy.  No really, it's used for screwing the neck onto a guitar body. And speaking of screwing - it is also a bit of Welsh culture and Druid mythology that I'm taking without asking.  So, for all you Welsh Druids out there - I'm gonna steal your culture.  Look out!

What you are actually looking at is the Druid symbol of the Welsh word - Awen.  Awen means "inspiration" - usually of a poetic nature.  I guess the Druids liked the word and decided it needed a symbol to go with it.  And who are we to judge?

Great Expectations
I thought it would make an interesting image on a neck plate and back in 2015 planned for it to go on the first guitar I finished that year - hence the 2015-001.

(Editor's note - no guitars were finished in 2015).

It just so happened to be a gold neck plate - so it's perfect for this build.  Better late than never!


I like the cut of his jib

Speaking of necks - we're gonna need a place to put that thing.  I routed out the neck pocket on this body blank using the process I have used on the last couple of builds that I've worked on:  Trace the outline of the neck shape on a piece of particle-board (or plywood) and cut out that shape with a jigsaw.  Then use that shape as a tracing template for my router.  What you can't see in the above picture is that everything to the left of that last fret is the overhang.  The thickness of the whole neck minus the thickness of the overhang is how deep the neck pocket needs to be routed - so that the overhang sits flush to the body.

Flush
As is quite typical at this point - things fit pretty well.  The neck fits in the pocket nice and tight and the neck is straight and level.  It's only later - when I start monkeying with things - that I'll mess it up!


"Aren't you a little short for a StormTrooper?"
 As you can see - this is a short-scale thing we're building here.  A normal guitar has a scale length (the distance from the bridge to the nut) - or total string length of 24.75 to 25.5 inches.  This puppy will be about 20.5 inches.  Also, the width and depth of the neck are much smaller than a normal neck.  Hopefully, this will make it easier for little hands to hold it.

Diggin' Holes
In addition to the neck pocket, I also routed out the hole for the pickup.  I'm going to go with a Humbucker for this build for two reasons: I already have one left-over from another build and humbuckers are quieter than single-coil pickups (as in they don't hum as much - hence hum-bucker).
I already have a humbucker routing template so this went fairly quick.

Diggin' More Holes
 I also drilled the hole for the input jack (where the guitar cable plugs into the body). If you look at the center of the hole you'll see a little light.  That's the pickup cavity in the previous picture.
The below picture is a detail shot of this.  I chose to go really primitive with the electronics for this build as I didn't want to overwhelm my Son with switches and knobs and I didn't want to overwhelm myself with soldering headaches.

Holes inside holes.
When I'm done with this build it will have one pickup, one volume knob, and an input jack.  Low-tech but just enough to do some damage.

Thursday, October 19, 2017

More tools and jigs

Am I a Liar?
Yes.  Yes, I am a liar.

So, I decided to start working on the Les Paul again after a loooooooong hiatus.
I got myself all psyched up to get my hands dirty fixing the neck and neck pocket.  This morning I took the body and neck down from the fridge, took one look at it and decided, "I'm not working on the neck pocket today. " Even though I haven't touched this project in 18 months - I'm going to 'switch gears' and work on the neck.

Okay - here we go...

I had alluded to the fact that I was going to make some drastic changes to the neck in a previous post. Here's where we dig into that process.  My plan is to take the existing neck that I bought from Guitarfetish and add the following:

  1. A headstock veneer to match the body
  2. Binding all around the neck
  3. Replace the existing diamond inlays with standard Les paul 'block' inlays
  4. Install an Irish coin inlay (most likely a 1 penny piece) in the headstock
If you've been following along - I finished the headstock veneer a while back.

Today we'll look at how to do the binding around the neck.
The binding was going to be a mixture of easy and hard.  Most of the binding was going to be set in straight runs (with few curves) but I wasn't sure how I was going to route the channel for the binding as I don't own a router table.  This kind of work is hard to do freehand with a router as the neck is curved on both sides and tapered to boot.

After a quick trip to google - it became clear that I had all the necessary parts to build my own primitive router table.  So, first up: build a router table.

Kinda looks like a reject from 'The Lego Movie.'

 The process is actually quite brief.  Take the bottom plate off of your router, trace the outline of it on a flat and wide board (most people use plywood or melamine as they don't warp easily. I used Particle Board which also doesn't warp easily but isn't as durable - it's what I had on hand).

Make sure to mark off where the holes go to attach the board to the router and start drilling holes.  I made a one inch hole in the middle of a sheet of particle board for any router bits to fit through and drilled four 1/8 inch holes for the mounting screws.  I also used a 1/4 inch forstner bit to countersink the screws so that they don't bump into the workpiece.

Once the holes are all drilled - screw the router base onto the bottom of the board, turn the board upside down, mount it to something (I used a black and decker workmate bench), and adjust the height of the router bit until it pokes through the hole.  Voila!

It took almost as long to write this description as it took to make the thing itself.

For any of the more seasoned luthiers/woodworkers out there - this is a temporary router table.  I'm aware that this won't last (particle board warps).  But it got the job done and I didn't have to drop $300 at Rockler.

Anywho!  This particular router bit is larger than the ball bearing on the top - so the ball bearing runs along the work piece and the blade cuts deeper leaving a channel that I can use to install the binding around the neck.

What? Me worry?

As the last several post about binding have proven - I have no idea what I'm doing!  So, we'll see how this goes.  But for now - there is a channel for binding, I have already purchased neck binding, and there's no legal or ethical reason why I can't just bind this sucker at any given moment.

Thursday, October 5, 2017

Hey baby, where you been?


I've been right here, fool!
For the last couple of months I've been giving the guitar body on this build all the love.  What about the neck?  I guess it's time to see where we're at.

I bought this neck from Warmoth soon after I started this build - back in 2010.
It was then (and is now) ridiculously expensive.  I would never spend that much on a neck ever again.  But at the time - it made sense.  I was unsure of my abilities as a builder and had precious little experience.  Plus, the mechanics of a twelve string seemed to be overwhelming.
How strong did it need to be to carry the strain of twelve guitar strings tuned to pitch?  I had no idea.

Waiting on your sorry ass...
So, I bought the neck and other than installing the tuning keys and putting a finish on it - it needed nothing.  That certainly is one upside.  The build for this was done by professionals - so it looks good and it functions well.  No arguments there.  But I did want to personalize it a bit.  And of course that's where I got into trouble.  Back in 2010 I added the black stripe and the Irish 5 penny coin..  I was new to these things and as such - it didn't go as well as I would have liked.  Knowing what I know now I would do things a little different.but since fixing these errors would take a looooong time and I'm not sure the coin could be fixed (it's epoxied in there) I'm going to move forward and accept that the headstock won't be perfect.

...to finish what you started.
So, what are we doing?  I'm adding some color to the face of the headstock.  The neck is made of maple (the fingerboard is ebony) which is the same wood as the guitar top.  The difference is that the maple of the body is figured/flamed and the neck is not.  Also, the neck is quarter-sawn wood whereas the guitar top is plain-sawn wood, and finally, the two maples were of different colors - as happens when taking wood from two different trees.  So, my goal is not to match the two woods but rather put them in the same ballpark (I'd be happy with the same zip codes to be honest).

Shellac in esse
To put the headstock in the same color palate I needed to dye the headstock with the same dye and also use shellac.  It became clear to me that the shellac added a lot to the color.  So, I mixed up a small batch of dye and shellac.  You may have noticed in the above photos that I also taped up the neck and filled the tuning peg holes with paper towels to keep the dye/shellac to one area - the face of the headstock.  I'm going to spray the whole neck with nitrocellulose lacquer but I just want color on the face.

Shellac in potentia
I tried to grind up the shellac flakes as fine as I could - to minimize the time it took to dissolve in alcohol but there is no substitute for making this stuff 8 to 12 hours ahead of time.  Next time I will do so.  One other thing that you can't see here is that I added a little dye directly to the shellac to darken it up.  It worked a bit to deepen the color of the shellac - which was good as the neck didn't soak the dye up like the guitar top did.

Wad

Wet

Repeat

After a few coats of dye and about four coats of shellac I was left with...

Whatcha gonna do now?

A slightly brown face.  And all of my mistakes highlighted by the dye.  Oh, goody!
In these last few pictures you can see where my chisel slipped, where the black strip was chipped, and basically everything that isn't quite right.  Ah well...


1970 Irish 5 penny coin
To help things out I used some pore filler to even out the rough spots.  As I wait for that to dry I'll do some soul searching to see if I want to try fixing some of these "beauty marks."

Hmmm...

Monday, October 12, 2015

Covering my assets

Those are some big clamps

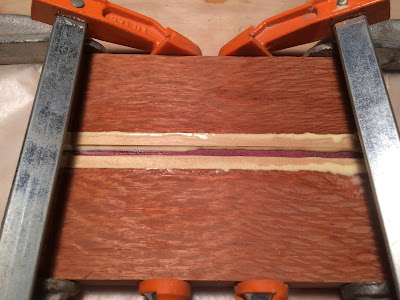
This picture may be deceiving.  I am not, in fact, gluing up another body blank.  The above photo is documenting the first stage of making a veneer for the headstock overlay.  I did this once before on a lapsteel guitar that I built.  But in that case I was using store-bought paper thin veneer and it was to cover up a rather glaring mistake.  This time I'm making it from scratch and it is to tie the neck and the body together in an aesthetic way.  The above laminations are some of the scraps left over from gluing the body blank together.   The two outer pieces are Lacewood, the middle pieces are Basswood and center piece is Purpleheart.  Instead of using the extra mahogany I had left over I just turned the Lacewood on its side - to really show off the laces - as I felt this was missing from the body blank.  I glued and clamped just like with the body blank and was left with this:

Hey, look at that...
A chunk of wood!
Since this was going to need a lot of work - I didn't sand or scrape it much at this point.  I did scrape away any excess dried glue (aka squeeze-out) on the face - but only enough so that this would be flat - not finished.
All your fetishes, nightmares, and guitar plans can be found on the interwebs.
As I am building a Les Paul style guitar - I wanted a Les Paul style headstock.  The Epiphone that I have been using to model/measure doesn't have the traditional Les Paul headstock - so I went digging (or is it trolling - I can never remember) on the internet.  The above image is what I found.  I don't love the above image.  It's close to the shape I had in mind but it's not exact.  The very top of the headstock looks like an open book (or a mustache).  This version is a bit too voluptuous for my taste. I think it should be a bit more subdued.  So, I'll probably modify this.

Anywho!  Depending on which headstock you are creating an homage to, you would: find the image, print it out and then take an exacto blade to it.  And you are left with:

No trademark infringement is intended or implied
One other issue that is a bit of a problem for me is that the headstock on the neck I am modifying isn't the same length or width as the above template.  So, I will need to nip and tuck a bit - on both the existing headstock and the template.  That may cause havoc with the tuning peg holes (the six circles in the above picture).  But we'll burn that bridge when we get to it...

You know the drill...
You trace!

It's the same as about...
You cut with a jig saw!

50% of the posts on here...
You sand!
It's all a bit repetitive, no?

Ah!  Here's something new and dangerous...

You are left with a big frickin block of wood.  How the heck are you going to add this to the headstock?  It'll be two inches thick...?  

Now is the time that you make yourself a veneer (aka a really thin piece of wood).  The best way to do this in a home shop is with a band saw.  Sadly, I don't have one.  And I wasn't wild about the idea of using the jig saw for this.  A jig saw would just make a mess of it.

You could try using a table saw and running the piece through once then flipping it over and running it through again.  But how do you hold such a small piece of wood with a spinning blade of death so close to your fingers?  (No, seriously, if any wood workers want to share that bit of wisdom - I'm open!).  The safest way (and the most time consuming by far) is to use a hand saw in a miter box.  

...so, of course I didn't do it that way either...

I covered the whole thing in double-sided tape, stuck it to the end of a 4 by 4 piece of stock, and ran it through the chop saw.

Kind of like this...
Lessons learned?  
Well... It worked!  
And the saw didn't kick the wood out and hit me in the teeth.  So, I'm kind of happy about that.  

In truth - even after it went through the saw - the workpiece was still pretty stuck to the 4 by 4.  So, it was fairly safe.  I didn't take pictures of this because I was concerned that someone would try it and lose an eyeball (wear your eye protection, you whippersnappers!) but I thought I should come clean - as a big part of this blog is to share my experiences - not just the outcomes.  

Having said that - just as a way to cover my own, ahem, assets - please test the adhesion before you try this.  I made sure that the workpiece and the 4 by 4 were strongly adhered to each other.  I kept my body and face away from the most likely kick-out path of the workpiece.  And I wore enough protection that most of my face was covered (eyes, ears, and nose/mouth).

Another thing that I didn't photograph (but should share) is that I had to do this a second time because the above veneer was too thick.  The second one was about two thirds as thick as the above veneer - and that's the one you see in the photos below.  I used the same process and had the same results.  
I'm always open to safer methods - so please feel free to comment if you have an opinion.

I mustache you...
Do you know how to use that thing?
After the veneer was cut to thickness - it needed to be reshaped to fit the headstock of the neck I'm using.  I used a coping saw to cut the rough shape of the top and also remove a bit from the bottom (where it meets the neck/nut) with the chop saw.  It's hard to see in the below picture but the existing headstock is asymmetrical - so that's why it had to be shorter - as the new headstock shape is symmetrical.


Pictured: Fiddly Routing
Once the headstock veneer was close enough to the shape that I want (yet still fit on the existing headstock) it was time to bust out the router.  Now, with such a thin template (the actual veneer) and the intricacy of the shape - this was some finicky (nay fiddly) routing.  I tried using the double-sided tape to adhere the veneer and the existing headstock - and it worked like a champ.  So, I didn't need to break out any clamps for this job - which made it easier.  Be careful though - if you don't use enough tape - the router will turn that veneer into a missile
.
That's when it goes from fiddling about to flinging about

As you can see - there is some clean up work to be done.  Much of it can be done with the belt sander. Some needs to be done with a coping saw, micro files, and a very sharp chisel.  

How sharp?
Very.
When we get to the part where I glue the veneer to the headstock I'll tackle this properly.  
There's still loads to do (tuning key holes, final shaping, binding, etc.).
Until then here is a preview of things to come.


Dirty Irish Money
Dirty Sexy Guitar


Wednesday, October 7, 2015

Don't Fret

Am I the only one that thinks this looks like a sad Teenage Mutant Ninja Turtle?
You may notice that there are some missing frets in the above picture.
In my usual style I said, "F--- it! Why not?"
If you look closely - the remaining frets have some life left in them.  I probably could have just 'dressed' them and moved on with this build.  But I have too many plans for this neck.
...and not nearly enough sense in my head.

I really want to see if I can put some binding on this neck.  It's tough to do once the fret board is glued to the neck - but not impossible.

However, it is nearly impossible to do it with the frets still installed - so off they must come.
Also - I thought I could get over those diamond fret markers.  ...but I can't.  I'm just not a diamond kind of guy.  So, those will have to come out at some point too.  As you can tell - the neck is going to need some work.  Here's what we're doing today.

I'll cut a B...
Wait, I already used that joke...
First thing you should do is to score the wood under the fret.  This is an essential step on a fretboard that has been lacquered (many Fender maple fretboards) but it's also a good idea on a rosewood fretboard like this one.  The exacto blade let's you get under the edge of the fret and start the process of loosening it from the wood beneath it.  Scoring the wood like this can (should?) help minimize the wood's tendency to chip when you pull the fret wire out.  Also, many guitar manufacturers glue their frets into place.  This can help start to break that bond.

"Feelin' Hot Hot Hot!"
C'mon - who doesn't love a little Buster Poindexter?

Next I busted out (get it?) the soldering iron.  This is supposed to serve two purposes.  1) If the fret is glued in place - the heat will melt the glue enough to loosen things up. 2)  It's supposed to warm up the wood and make it expand a little.  Which seems counter to what you would want in this situation...  So, maybe that's bullocks.  I don't know.  But I did it anyway because smarter people than me have decided it's a good idea.  You heat one fret at a time.  I placed the tip of the iron on one side of the fret for about 30 seconds and then on the other side for about 30 seconds.  Then you remove the fret.

I'll cut a...
Oh, yeah.  Right...
This next step is one of my own making.  Most luthiers that I've seen re-fretting a neck don't use a utility razor in the process.  My rationale is that I don't have a set of pliers/clippers that are small enough to get under a fret that is properly seated.  But the blade from a utility knife does the job pretty well.  Would I use this process on a 1950's Les Paul?  Probably not.  But it works for me in most other cases.  I use the sharp end to get underneath one of the corners of the fret and then use leverage to pry up that corner - just enough to get a small set of pliers under there.

Resist the urge to just yank it out.
That would be counter-productive.
I then 'walk' the pliers from one side of the fret to the other.  Slowly lifting the fret out of the fret slot.
This has two effects:  1) It pulls the fret out (duh).  2) you are pressing and squeezing the wood fibers down - which keeps the chipping to a minimum.  All of this is to avoid having to fill gaps that you create when you pull out rosewood that you shouldn't have pulled out.

When you are done - you only have to repeat the process 23 times!

Once I got to about the 3rd or 4th fret I got into a rhythm and removing the remaining frets took about 2 to 3 minutes each.  This is one of those times when everything went my way.  If these frets had been glued in - it probably would have been a much longer process.


My successes and failures - in detail!
So, how did it go?

Not too shabby.  The very first fret (all the way to the right in the above picture) was the worst in terms of chipping.  It's not great - but most of that damage will be covered when I install the new frets.  I'm also going to sand the fretboard down a bit when I install new fret markers - so most of that damage will disappear anyway.  The rest of the fret slots look just like the other two in this picture - which works for me!  I'm satisfied this will do just fine.

How often do you get to describe a photo as full of studs and tang?
The pile of spent frets looks like this.  A fret is made up of three parts: The Crown, the Tang, and the Stud.  If you can't see it from the above picture - take a look at this fret cross-section to get a better idea of what I'm talking about.  The guitar string is pressed down against the crown.  The tang is what sits in the fret slot.  The stud is what keeps the fret in place.  It acts like an anchor in the fretboard.  It's designed to go in easy and come out hard (yes, I giggled a little when I wrote that sentence).
But in all seriousness - it is designed to be difficult to remove.  I'm very happy that this part of the process went as well as it did.  With a very dried out rosewood fretboard (or an ebony fretboard) the tendency to take out big chunks of wood with the fret is high

Hey buddy.  Yer slots are showing.
One thing I noticed about this neck right away made me wonder who the original manufacturer was.
None of the fret slots go all the way to the edge of the fretboard.  This is usually how frets look on a board that is bound - there's a space at the edge - like in the above image.

Most Strats and Tele's I've played don't have this gap - the slots go side to side.  And there's a good reason for this - it's hella easier to cut the slots and hella easier to cut the frets if the slot goes end to end.  It's cheaper too - when you are pumping out 10,000 guitars a day - like the big boys do.

If the slots are like this one - not only do you have to specifically cut the board this way - you also have to remove the fret tangs right at the edge (like in this image).  This is a much more involved process.  Which is odd if you are not binding the fretboard.  It looks like this was a board that was built to be comfortable.  Which has me thinking it was on a decent guitar in its prior life.

But it also means...
I now have to trim the tangs off all of the frets when I re-fret this - whether I bind it or not!
Good times...